The thoughts, feelings, and projects of an expanding solitary.

Friday, January 15, 2016

DIY Portable Dream Board Tutorial

The Introspective/Personal Bit
     It's not a big secret that I'm not the best with budgeting my money. I like to shop. a lot. I've gotten better over the years at not spending excessive amounts of money and I'm not in financial trouble because I can't control my desires to buy all the shineys or anything like that. But, I do spend more than I need to, especially when I have goals for the future that require money. So I am starting a few things to really help me to spend (or save) money where it would make me actually happy and peaceful. Two of the things I am working on are a budget (which I may post on more later) and a portable dream board. Since I travel for work I wanted something that folded down small and could fit into a journal or planner so I could always have it with me. Who knows, maybe it would be helpful when I'm in Target and wanting to feed my addiction and buy that really cute purse haha. I'm hoping that this board will help me to make decisions about my money that, in the long run, will make me happy and remind me of the budget that I have set up for myself. Basically reminding me that if I buy X now, I'm actively taking money away from building a greenhouse or or buying dog food. Instructions on how I made mine are below.


The Crafty Bit
     As I said in my "introspective bit" I created this dream board to remind me of the things that I want in my future. It's specific purpose for me is to help me to realize why I am saving money now. Dream or vision boards have a lots of different purposes for many people and you may want to create yours for a different reason- maybe to remind you why you exercise or to be kinder to others or to work towards whatever desires or goals you have in life.

Basically, they can be helpful for days when you feel like this.

     So what's the difference between this and a Pinterest board? I really think that it is the physcial-ness of it. Performing the action of picking out the photos and creating something feels more tangible and meaningful than just pinning something you will likely not look at as often. Having the physical thing with you is also different. You can pull it out at any time and not be distracted by  things on your feed or other boards. You can set it in a place where it is visible, like your dresser or your desk at work.
     So what's the difference between this and a traditional dream board? This version is small and portable. You can put it up where ever you are - at home, in the office, etc and then you can take it down and carry it with you easily. It's also nice to be able to take it down if you have dreams and desires that you're not ready to or wanting to share with others, like if you have a party at your house. It's also nice to be able to carry it with you even when you aren't expecting to look at it. Sometimes you need motivation when you least expect it.


Alright I'll stop blathering on and get to it!

1. Choose the material for your base. I made mine out of 6 blank cards. I wanted something a little more sturdy than plain printer paper and I had some blank cardstock sitting around. You could easily make this out of different materials though. No need to run out to the office supply store.


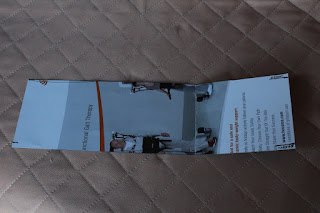
2. Assemble your base. I used washi tape to tape together my cards and folded the long strip accordion style.


3. Choose inspiring images. This is the part where I can't tel you what to do! But to give you an example: I picked images that represented freedom to signify myself being debt free from student loans, pictures of the kind(s) of dog(s) I want to own one day, pictures of what my future family may look like, pictures of gardening, greenhouses, fields, and farm animals to signify my homesteading dreams, and pictures of beautiful houses and art studios to signify my desire for an ancestral home and peaceful locations to grow.

4. Attach your images. I just used a glue stick. Nothing too complicated! I just made sure to avoid putting any images over any of the folds so that none of my pictures got worn down with repeated folding.

I completed mine in a few hours and that was just the front of the board. I am planning on doing something else on the back- a more short term dream board. Really, more of a motivation board than a dream board. Basically, I want to put on images that remind me why I want to do the little things that I want to do - like exercise, meditate, research, create, etc. I think that half would be especially helpful on those days when it's so hard to get out of bed and all you want to do is be a burrito and watch TV!


Wednesday, January 13, 2016

Purse Necklace/Medicine Pouch Tutorial


    I have seen so many cute medicine pouch/peyote pouch necklaces on Pinterest and I think they are so cute but they're so small, what the heck would you put in them? I'm sure some people put crystals or their drugs or something like that in there, but I really wanted something more functional. I've always liked the idea of having something small to stash my ID, credit card, and some cash in when I go to a club or somewhere I don't want to carry a purse. So, I thought the medicine pouches would be cute converted into this purpose!
     So without further ado, here are steps for you to make your own:

1. Create your pattern. You can do this by cutting a long strip of paper that is a little wider than your credit cards. My pattern length and width is exactly 3 1/8 inches by 10 3/4 inches if you just want to use that measurement.
Complex stuff, right?


2. Cut your fabric. It would be useful to use a pinking shears if your fabric is prone to fray. This is not necessary with some fabrics like felt and leather. I used leather from a cheap old coat from a thrift store. This project is so small that all you need is scraps.


3. Fold up the bottom to create the pouch. You want to make sure you have right sides facing (i.e. the part you want to show on the outside is on the inside right now). At this point if you are using a fabric that frays you will want to create a hem at the top before sewing the side seams. You will not need to create a hem with fabrics that do not fray such as leather or felt.
Here is a loose weave wool and a linen shown right sides facing. I used a pinking shears to cut and created a hem on the op inside first before stitching the side seams.

4. Sew up side seams. For mine, I used a 1/8 - 1/4 inch seam allowance. I know that this is small but a big seam allowance will make your pouch look bulky and will interfere with how much you can fit in it. I used a sewing machine, but this would also look cute hand sewn.
My side seams are sewn and right sides are still facing.

5. Turn it right side out and cut/sew the flap the way you want it. To make it have that finished look, you may want to clip your corners and iron your seams open so that when you turn it right side out, you can iron it again with right sides out to have a flat polished look. Keep in mind that you cannot use an ion on leather or suede directly. I did not iron my leather pouch and it is fine, but if you really want to iron leather you will need to lay down another fabric on top of it.
This is the inside flap of one made of linen. I used a pinking shears to cut the fabric and I made a nice folded 1/8-1/4" hem.

6. Create the loop to wear around your neck. For my leather one I chose just leather cording you can get at any craft store. I sewed it on the the flap nearest the opening and just tied a simple knot in the back. The knot looks kind of bulky but I don't even feel it when I'm wearing it and you don't see it so it's nice to have it be fully adjustable for length. For the pouches I made out of fabric, I braided or weaved floss and attached it in the same manner
Here you can see how I machine stitched on the leather cording.


7. Create a closure of some kind. You can pretty much do this how ever you want. You could use a button and button hole, a button and a piece of twine to wrap around it, a bracelet closure, or just hang something heavy from the flap to keep it weighted down as I did with the leather pouch. Sometimes, simply making the front flap long is enough to keep it closed.
The flap of this pouch is enough to keep it closed while wearing.

Button and button hole closure

8. Embellish. You can put beads or embroidery on your pouch to give it that finishing touch. Sometimes it may be easier to do the embellishment first so that you do not have to worry about accidentally embroidering through multiple layers.

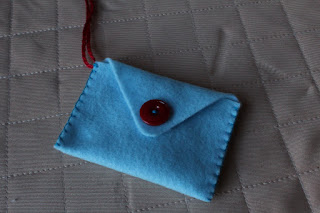
Note: The white and blue ones I showed have slightly different patterns than the leather one, but they still use the same ratio. I wanted one that had a fringe on the bottom so instead of folding over, I just used 2 different pieces of fabric, right sides facing, so that I basically sewed a tube. Then turned right sides out and sewed up the bottom. For the envelope one, I basically just increased the width of my original pattern and made sure it would fit around a few cards.


Tuesday, January 12, 2016

Early January Musings

Trying out the new format for my posts. If you're not interested in one section of the blog you can skip it!

The Science Bit
     So I'm just going to give a quick summary of some of the research I've been reading lately. It's mostly from the Journal of the American Physical Therapy Association (PTJ) since that's what I have a subscription to! There was a meta-analysis of treatments for temporomandibular disorders (AKA TMD, TMJ, jaw pain, etc) that I found interesting, especially since, in my experience, it is an area that a lot of professionals are lacking in education and experience, so I was glad to see it highlighted this month. Also, I personally like treating TMD so I was happy to see it for that reason as well. The meta-analysis included 48 studies and states that, overall, the quality of the studies is low and thus calls for more research with less biases present. However, I still like to look at the information, even if it might be biased. I think that biased information can still be useful as long as it's not intentionally falsified information and may point to some trends or at least give some indication of interventions available for a given disorder. So here are the details. For Muscular TMD: 2 studies demonstrated clinically significant changes on pain and function with postural exercises. Additionally, 4 studies supported the use of manual therapy to treat muscular TMD. Another found that cervical manipulation has immediate effects on cervico-craniofascial pain when compared to placebo intervention. For Arthrogenous TMD: Most studies that evaluated the effectiveness of jaw and neck exercises indicated positive effects, though not always significant when compared to control group. More studies showed a significant effect on pain with a combined intervention of manual therapy and exercises compared to using splints, medications, and other non-conservative methods (e.g. surgery) For Mixed TMD: 11 studies found significant effects for general exercise compared to control groups, but when compared to other conservative interventions (splinting, postural correction, acupunture) there was no significant difference. 6 studies showed mixed results about the effectiveness of manual therapy alone to treat pain and function. 2 studies reported benefits of manual therapy plus exercises, even more so than exercise alone.
Additionally adverse effects from the studies were reported. I think that the important take home from that section was that there were NO adverse effects reported from any of the any of the manual therapy or exercise based studies.

So basically it seems that from this research, that some kind of treatment is better than no treatment, but no intervention blows any other out of the water (except for maybe manual therapy alone which didn't seem to be as effective as other interventions or in combo with other interventions...Not too big of a shocker there though!).

citation for this article: Armijo-Olivo S, et al. Effectiveness of manual therapy and therapeutic exercise for temporomandibular disorders: systematic review and meta-analysis. Journal of American Physical Therapy Association. 2016;96:9-25.

I apologize for any errors I made in my citation. I'm sure I did, but you get the gist! And since I'm not being graded on it anymore I really don't care haha

Also, I'm pretty excited because in last month's PTJ there was an article (co-authored by Linda VanDillon, one of my former instructors) about an upcoming randomized controlled trial about Movement System Impairment interventions. whoo!

The Introspective/Philosophical Bit
     I've been feeling unmotivated for some time now. I could say as long as years, but time is fluid and perceptions are flawed. I've been struggling with finding meaning and motivation to do pretty much anything. I feel tired and old and like doing even the things that I "want" to do are chores. If you have to force yourself to do the things that you "want" to do then do you really want to do them? I operate from a base that there is no objective morality (and ultimately that there is no morality at all - it's just a made up system to get people to act a certain way) and thus I have tried to eliminate global "shoulds" from my life. That makes everything on an individual level and the only "shoulds" you have are those that help you to meet your desires. But sometimes I can get stuck with this thinking. As one of my friends put it recently, "I no longer have a god or a universe to whisper these things to me or an institution to flog me into the correct path," so that leaves only me. And if there is no objective thing to guide me and no true right or wrong, then what is the difference between any activity that I choose to do? Why is consuming any different than creating? Why work so hard and push myself to draw or paint when I could just watch TV instead? Why climb the mountain to see the sunrise when I can kind of see it from down here? I just don't know where to find the motivation many times. It used to be easy and flowed. I desired to the things I said I wanted to do. Now I just want to want to do those things. How do you make yourself think that to see that sunrise with worth the climb?

The Crafty Bit
     My creative endeavors this month have been focused on making knotted/woven bracelets and some sewing projects. I made a little caddy for my car to hold my sunglasses and cell and other little things and I've made a few medicine pouch necklaces for holding ID, credit cards, cash, etc when I don't want to carry my purse.

This one is made of leather and I just put a wrapped stone on it so the flap would hang closed. I sewed it up with a sewing machine as opposed to by hand because it is way faster. I've made the pouch part for a few others but haven't finished the necklace part. So basically if you wanted to do this yourself all you need is the fabric you want cut into a long strip. My strip is exactly 3 1/8 inches by 10 3/4 inches. So you cut it out, fold up the bottom about 3 1/4 inches then stitch up the side seams with a 1/8 to 2/8 seam allowance (tiny, I know). Then, turn it right side out and you're pretty much done. I will likely post more on this later as i plan to make more out of different fabrics and closures.


The Reading Bit
Current books I'm reading are The Sandman: Overature and The Dark Tower Series book 6: Song of Susannah (no spoilers please!)
I've been reading the Sandman comics for about the last year and am sad to see it finally come to an end, but, who knows, there may be the potential for more. Afterall, Overature did come many years after The Wake.
And I first read The Gunslinger and started the Dark Tower series when I was in high school but stopped. Though I started it over again a little over a year ago and have been fully recommitted to finishing it. I've been reading the books aloud to my husband some nights before we go to sleep and it has been a good experience. He has already read the entire series but was interested in reading it again. He has dyslexia and is not big on reading fiction due to this so it has been a nice bonding type experience.

Also, as far as non-fiction goes I am reading The Backyard Homestead Guide to Raising Farm Animals by Gail Damerow. I am loving this book so much. My husband and I are interested in homesteading and this is a great book. It's so detailed but simple to understand for someone who knows little about farm animals. It's also not a boring read filled with highly technical stuff and its actually funny in a few places. So if you are at all interested in homesteading or owning an animal I would highly recommend it.

I'm a terrible blogger

     I truly am very bad at this whole thing. Sometimes writing a blog sounds like a great idea and sometimes it seems like a waste of time. I go through cycles and I forget. I think what it is is that I have a desire to share, but also feel uncomfortable being exposed. And really, who am I exposed to anyway? It's not like anyone reads this shit. So really, the only point in doing it is to satisfy some kind of desire in me to put words out into the universe or something. I guess there's always the chance that someone could find what I post to be interesting, insightful, or helpful... if I followed through on it maybe. But for the most part is has kind of seemed like a public journal to me. And what is the point in that? It's not like it would be like a REAL journal. All the juicy details stay secret. So then if you're into the whole journaling thing you're really just writing two journals: one where you put what you really feel and think and one where you write what you want people to see that you feel and think. So either a blog is just like any other social media where you vent and portray a picture of yourself or you make it into something else.
    In the beginning I wanted to create a blog that helped people with personal projects while also showing off all the cool stuff I make and think about. So I started initially to write about philosophy and show off my sewing skills and teach others how to make a Battlestar Galactica uniform costume. I didn't do that. I made the costume and it's very cool, BTW. But I can't completely remember how I assembled it so I'm not much help there. But I suppose I could be for future projects I make.
   I've been thinking of a new format for blogging though. Something that shows all of my interests and thoughts in a way that might be more interesting to others as well. Basically mini blogs within a blog that are all different topics. So in each post there will be different sections that could vary from philosophy, science, professional, personal, etc. And if you don't give a hoot about my personal life, but like what I have to say about science, you can scroll right past it to the good part :)


TLDR: I suck at blogging, but I'm going to give it another go anyway. Stay tuned for new formatting!