The thoughts, feelings, and projects of an expanding solitary.
Showing posts with label tutorial. Show all posts

Friday, January 15, 2016

DIY Portable Dream Board Tutorial

The Introspective/Personal Bit
     It's not a big secret that I'm not the best with budgeting my money. I like to shop. a lot. I've gotten better over the years at not spending excessive amounts of money and I'm not in financial trouble because I can't control my desires to buy all the shineys or anything like that. But, I do spend more than I need to, especially when I have goals for the future that require money. So I am starting a few things to really help me to spend (or save) money where it would make me actually happy and peaceful. Two of the things I am working on are a budget (which I may post on more later) and a portable dream board. Since I travel for work I wanted something that folded down small and could fit into a journal or planner so I could always have it with me. Who knows, maybe it would be helpful when I'm in Target and wanting to feed my addiction and buy that really cute purse haha. I'm hoping that this board will help me to make decisions about my money that, in the long run, will make me happy and remind me of the budget that I have set up for myself. Basically reminding me that if I buy X now, I'm actively taking money away from building a greenhouse or or buying dog food. Instructions on how I made mine are below.


The Crafty Bit
     As I said in my "introspective bit" I created this dream board to remind me of the things that I want in my future. It's specific purpose for me is to help me to realize why I am saving money now. Dream or vision boards have a lots of different purposes for many people and you may want to create yours for a different reason- maybe to remind you why you exercise or to be kinder to others or to work towards whatever desires or goals you have in life.
Basically, they can be helpful for days when you feel like this.

     So what's the difference between this and a Pinterest board? I really think that it is the physcial-ness of it. Performing the action of picking out the photos and creating something feels more tangible and meaningful than just pinning something you will likely not look at as often. Having the physical thing with you is also different. You can pull it out at any time and not be distracted by  things on your feed or other boards. You can set it in a place where it is visible, like your dresser or your desk at work.
     So what's the difference between this and a traditional dream board? This version is small and portable. You can put it up where ever you are - at home, in the office, etc and then you can take it down and carry it with you easily. It's also nice to be able to take it down if you have dreams and desires that you're not ready to or wanting to share with others, like if you have a party at your house. It's also nice to be able to carry it with you even when you aren't expecting to look at it. Sometimes you need motivation when you least expect it.


Alright I'll stop blathering on and get to it!

1. Choose the material for your base. I made mine out of 6 blank cards. I wanted something a little more sturdy than plain printer paper and I had some blank cardstock sitting around. You could easily make this out of different materials though. No need to run out to the office supply store.


2. Assemble your base. I used washi tape to tape together my cards and folded the long strip accordion style.


3. Choose inspiring images. This is the part where I can't tel you what to do! But to give you an example: I picked images that represented freedom to signify myself being debt free from student loans, pictures of the kind(s) of dog(s) I want to own one day, pictures of what my future family may look like, pictures of gardening, greenhouses, fields, and farm animals to signify my homesteading dreams, and pictures of beautiful houses and art studios to signify my desire for an ancestral home and peaceful locations to grow.

4. Attach your images. I just used a glue stick. Nothing too complicated! I just made sure to avoid putting any images over any of the folds so that none of my pictures got worn down with repeated folding.

I completed mine in a few hours and that was just the front of the board. I am planning on doing something else on the back- a more short term dream board. Really, more of a motivation board than a dream board. Basically, I want to put on images that remind me why I want to do the little things that I want to do - like exercise, meditate, research, create, etc. I think that half would be especially helpful on those days when it's so hard to get out of bed and all you want to do is be a burrito and watch TV!


Wednesday, January 13, 2016

Purse Necklace/Medicine Pouch Tutorial


    I have seen so many cute medicine pouch/peyote pouch necklaces on Pinterest and I think they are so cute but they're so small, what the heck would you put in them? I'm sure some people put crystals or their drugs or something like that in there, but I really wanted something more functional. I've always liked the idea of having something small to stash my ID, credit card, and some cash in when I go to a club or somewhere I don't want to carry a purse. So, I thought the medicine pouches would be cute converted into this purpose!
     So without further ado, here are steps for you to make your own:

1. Create your pattern. You can do this by cutting a long strip of paper that is a little wider than your credit cards. My pattern length and width is exactly 3 1/8 inches by 10 3/4 inches if you just want to use that measurement.
Complex stuff, right?


2. Cut your fabric. It would be useful to use a pinking shears if your fabric is prone to fray. This is not necessary with some fabrics like felt and leather. I used leather from a cheap old coat from a thrift store. This project is so small that all you need is scraps.


3. Fold up the bottom to create the pouch. You want to make sure you have right sides facing (i.e. the part you want to show on the outside is on the inside right now). At this point if you are using a fabric that frays you will want to create a hem at the top before sewing the side seams. You will not need to create a hem with fabrics that do not fray such as leather or felt.
Here is a loose weave wool and a linen shown right sides facing. I used a pinking shears to cut and created a hem on the op inside first before stitching the side seams.

4. Sew up side seams. For mine, I used a 1/8 - 1/4 inch seam allowance. I know that this is small but a big seam allowance will make your pouch look bulky and will interfere with how much you can fit in it. I used a sewing machine, but this would also look cute hand sewn.
My side seams are sewn and right sides are still facing.

5. Turn it right side out and cut/sew the flap the way you want it. To make it have that finished look, you may want to clip your corners and iron your seams open so that when you turn it right side out, you can iron it again with right sides out to have a flat polished look. Keep in mind that you cannot use an ion on leather or suede directly. I did not iron my leather pouch and it is fine, but if you really want to iron leather you will need to lay down another fabric on top of it.
This is the inside flap of one made of linen. I used a pinking shears to cut the fabric and I made a nice folded 1/8-1/4" hem.

6. Create the loop to wear around your neck. For my leather one I chose just leather cording you can get at any craft store. I sewed it on the the flap nearest the opening and just tied a simple knot in the back. The knot looks kind of bulky but I don't even feel it when I'm wearing it and you don't see it so it's nice to have it be fully adjustable for length. For the pouches I made out of fabric, I braided or weaved floss and attached it in the same manner
Here you can see how I machine stitched on the leather cording.


7. Create a closure of some kind. You can pretty much do this how ever you want. You could use a button and button hole, a button and a piece of twine to wrap around it, a bracelet closure, or just hang something heavy from the flap to keep it weighted down as I did with the leather pouch. Sometimes, simply making the front flap long is enough to keep it closed.
The flap of this pouch is enough to keep it closed while wearing.

Button and button hole closure

8. Embellish. You can put beads or embroidery on your pouch to give it that finishing touch. Sometimes it may be easier to do the embellishment first so that you do not have to worry about accidentally embroidering through multiple layers.

Note: The white and blue ones I showed have slightly different patterns than the leather one, but they still use the same ratio. I wanted one that had a fringe on the bottom so instead of folding over, I just used 2 different pieces of fabric, right sides facing, so that I basically sewed a tube. Then turned right sides out and sewed up the bottom. For the envelope one, I basically just increased the width of my original pattern and made sure it would fit around a few cards.


Friday, July 16, 2010

BSG Beginnings

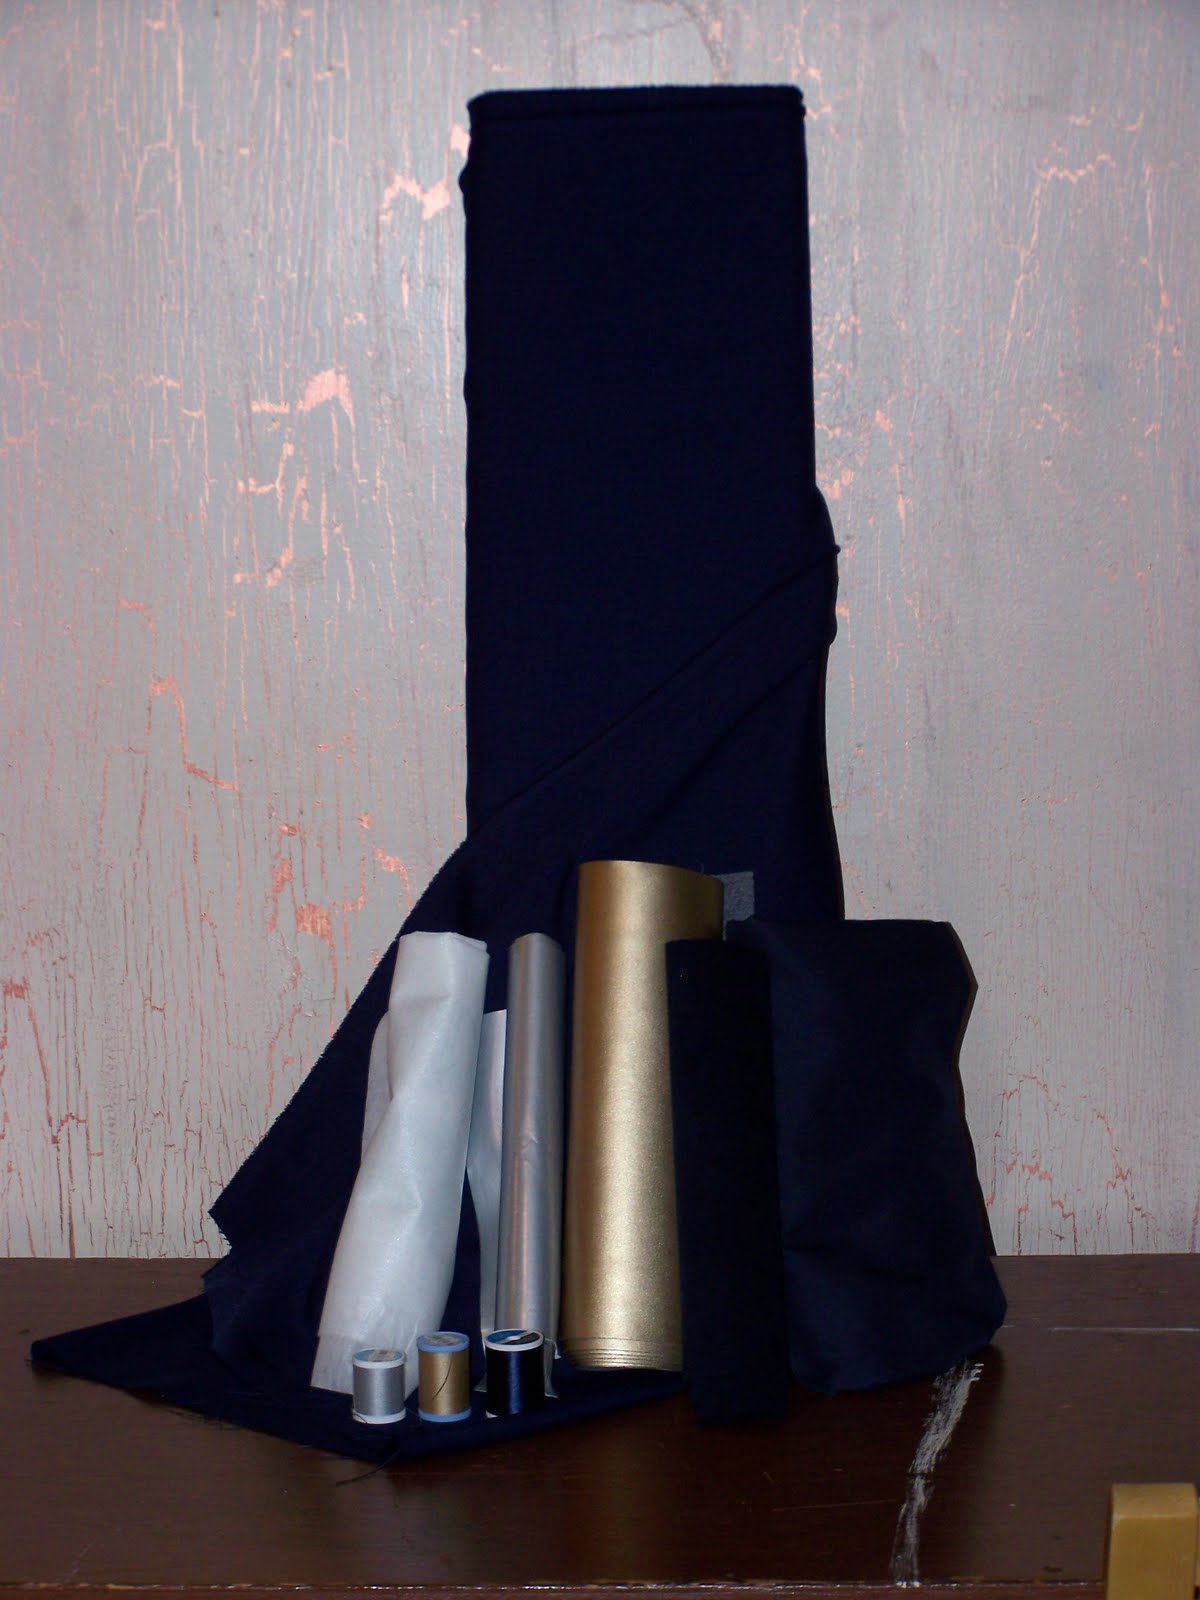
I have been working on getting started on making my Battlestar Galactica, or should I say Battlestar Valkyrie, costume. I am making an admiral's costume. So, as one of the purposes of this blog I am going to document my progress on my costume so I can keep track of it for myself and also I hope to post my entries on a BSG costuming site to help others make their own BSG costumes. It seems that there is a shortage of tutorials for them, especially for women. I haven't started sewing yet but I've made a list of what I will be using to make the costume. This list is subject to change as time goes on and I find out that I’m missing something haha


What You'll Need to Make a Female Admiral’s Uniform

Patterns:

-McCall’s M4745 (Men’s Civil War Costume – use coat B)

-McCall’s M5860 (The Perfect Jean Jacket – used as a reference to make princess seams)

-Vogue V8479 (Women’s dress pants)


Fabric and such:
-Navy Blue Suiting (I bought 6 yards of 'medieval blue melange' spring suiting (100% Polyester))

-Navy Blue Lining (I bought 4 yards to line the jacket)

-Fusible Interfacing (I bought ¼ yard)

-Silver Vinyl (I bought ¼ yard of shiny silver vinyl to make the piping – vinyl is used to make the piping of senior officers’ uniforms, not junior officers’ uniforms. Flat silver (gray) vinyl would also work nicely as long as it has some sheen)

-Gold Vinyl (I bought ¼ yard – see notes above for silver vinyl)

-Navy Ultrasuede (I bought ¼ yard, used for shoulder patches)

-Gold thread

-Silver thread

-Navy thread


Other Materials:

-1 Navy 4-in Zipper for the pants (not a “sports” zipper)

-Snap Buttons (it’s easiest if you buy a package with the application tool

included)

-Hook and Eye

-Rat Tail Cording (about 5 yards, used for piping)


Tools:

-Sewing Machine

-Various Sewing Machine Needles

-Hand Needles

-Iron and Ironing Board

-Pins

-Tomato Pin Cushion

-Tailoring Chalk

-Marking Pencil

-Sewing Gauge

-Measuring Tape

-Seam Ripper

-Sewing Shears (or plain scissors)

-‘Bodkin’ with Hook (see picture, used for turning tubes, don’t sweat it if you don’t have one – a safety pin will do the trick as well)


Accessories:

-Battlestar Patch (I bought mine from scifigeeks.com)

-8 Uniform Buttons (I got mine on eBay)

-2 Admirals’ Pins (eBay)

-Senior Flight Wings (eBay)

-Dog Tags (you can buy personalized dog tags at quantummechanix.com, but I am lucky enough to have an engraver for a brother so mine will be made by him)

-Law Pro Boots (I plan to buy mine at qmuniforms.com)

-1 ½ inch Navy Webbing Belt with Black Slide Release Buckle (I got mine at strapworks.com) (or you could make your own out of navy webbing and a slide release buckle)

- (2) ½ inch Black Plastic Slide Release Buckles (for cuffs)